
What We Can Learn From These Volatile Times in Venezuela
by JAVELIN
Ex-CIA Operative
Venezuela continues to experience a hostile mix of political turmoil and economic recession — a turbulent situation that has persisted for almost four years. The nation’s roughly 30 million citizens are dealing with food and medicine shortages and very unstable inflation rates.
President Nicolás Maduro has faced increased opposition. Hundreds of thousands of citizens are demanding Maduro step down and begging for foreign aid. Many of these protests have been met with military force from the government — hundreds of protestors have been killed and thousands more have been injured or jailed.
“Little has changed for the suffering citizens of Venezuela.”
During elections last October, many opposition candidates (who were predicted to win) lost to the current ruling party, which led many people to believe the voting had been rigged. As of now, President Maduro remains in power and little has changed for the suffering citizens of Venezuela.
The Struggle for Democracy
To be clear, I have never personally worked in Venezuela, but I know many people who have, which is where I get my knowledge.
One of the biggest problems is that the current government is anti-American, yet a large portion of the population loves America. The majority of Venezuelans want to be like us and enjoy the freedoms that we have.
The reason the government is so anti-American is no doubt due to their longstanding ties to other foreign governments like Russia. When Venezuela was thriving economically, Russia sold them billions of dollars’ worth of military equipment, including warplanes, tanks and firearms.
Even though Venezuela doesn’t have a well-organized intelligence operation, that isn’t to say our government doesn’t have people working intelligence on Venezuela. We do. These people are most likely working on what we call political economic information about the country. And I have no doubt that we are probably assisting the opposition leaders in their fight for a legitimate democracy. But with the ongoing protests and no relief in sight, we will certainly see more unrest in the future.
Prepare for Troubled Times Ahead
Whether or not you live in an unstable country, you should always be prepared for social unrest. Even here in the U.S. we have seen how something such as an unpopular court ruling can trigger mass protests, riots and looting.
Below are some important considerations to help you prepare in case, heaven forbid, we ever find ourselves in a situation similar to that of many Venezuelans.
1. Stay put. During any sort of unrest, you need to lie low and absolutely avoid leaving your home. You should already have at least 30 days’ worth of food and water storage built up for any emergency. But be sure to stockpile medications as well. As we have seen in Venezuela, pharmacies can quickly become barren. And don’t forget extra blankets and sleeping bags in case the power goes out when it’s cold. Today, I encourage you to spend 10 minutes evaluating if you could stay put (and survive) for 30 days without leaving your home.
2. Take extra security steps. If there are riots, there will likely be looting, so take extra steps to secure your home. In addition to having a security system with cameras, consider putting up bars or plywood over your windows. Unfortunately, desperate people have no problem smashing windows to steal, so adding an extra barrier will make your home a less attractive target.
3. Don’t fuel the fire. Be careful of how you protect your home. Law enforcement will be on high alert. If they see you sitting on your front porch with a shotgun, it could create more problems for you. So even though you should absolutely be prepared to defend your home and family, consider a less visible approach. (But be ready with a long gun inside in the event of a worst-case scenario.)
Lastly, you should strive to be 100% self-reliant. Folks in Venezuela are desperate for food, medication and many everyday items you and I take for granted. If you can’t stockpile all the items you might need, procure some gold and silver coins (such as American Gold and Silver Eagles). That way you’re able to barter and take care of yourself, because the government sure isn’t going to take care of you.
Erase Your Digital Footprint in Three Easy Steps
By Jason Hanson
1. Delete or deactivate any and all social media accounts. This also includes online shopping accounts with various retailers. If you can’t (or choose not to) delete an account, change any identifying information associated with that account.
2. Remove yourself from data collection websites. The easiest way to do this is to pay a reputable company to do it for you. But you can certainly do it yourself if you’ve got the time. You’ll have to contact private websites individually. Or you can contact search engine sites and request to have the URL containing your private information removed from any searches.
3. Delete your email address. This should be the last thing you do, since you’ll need a valid email address to complete Steps 1 and 2 above.
A Note From Your Editor
![]()
This year is absolutely flying by — believe it or not, September is almost upon us. Now, it’s back to school… back to football season… back to shorter days and cooler temperatures and spend-ing more time indoors.
Which is why it’s the perfect time to take a moment and reflect on the year to date.
A lot has happened in 2018 already. Storms, scandals, shake-ups — and it’s not over yet…
• Forecasters say we’re due for several more intense hurricanes this year — and we’re only halfway through the season
• Midterm elections are on Nov. 6 and people on both sides of the aisle are bracing for the impact
• Every day that creeps by our electrical grid is becoming older, more fragile and at risk
• No one is sure how the U.S.-China trade war will shake out — least of all those on Capitol Hill
• Talks with North Korea and its mysterious leader are still unresolved and Russia is still up to its old tricks.
It’s anyone’s guess what the future holds, which is why it is more important than ever to be ready for anything.
For the September edition of Spy & Survival Briefing, we decided to put together a “best of” issue. In addition to featuring some of our top stories, we wanted to assemble a primer of sorts, with a healthy mix of recommendations and advice on a variety of topics.
Some of these stories you may have read before. Some may be new to you. But all of them are relevant right now.
So stock up on supplies and make those emergency plans now, folks. Fall is almost here, and you know what that means…
Winter is coming.
Stay safe,
Jason Hanson
The Great Firearm Debate
![]()
How to Choose the Right Handgun for You
I’m often asked which type of handgun is better, a revolver or a semi-automatic? Well, the truth is there are pros and cons to both — it all depends on which one you’re more comfortable using. So allow me to break down the facts to help you decide which type firearm fits your needs best.
Revolver Raves
First, let’s go over some of the reasons people prefer revolvers for self-defense:
They’re easy to fire. A typical revolver has a cylinder that rotates with each fired shot. There is no need to feed the next round, and each round is separate, so there is no way for the rounds to jam or double-feed. Anyone who shoots often has at some point experienced an ammunition malfunction or feeding issue with a semi-auto. While it’s not something that happens all the time, it does happen. And if you don’t know how to fix it, you could be in trouble
“Obviously, if I was in a gunfight, I would rather have more rounds.”
A revolver is simple to reload. It’s easy to reload a revolver, because all you have to do is push the cylinder out and remove the expended cartridges. Then reload each chamber with fresh ammo and push the cylinder back into place. It’s not exactly a quick process, but it’s very basic. Reloading a semi-automatic weapon can be difficult for some people, because first, you have to pull back the slide to chamber a round. Someone who is elderly or has weak hands may not be able to manipulate the slide very well, which is another reason to consider a revolver
They require less maintenance. I’m a big believer in keeping your guns clean and properly oiled. Even if you don’t shoot often, it’s important to make sure you oil your semi-auto to keep the contact points lubricated. While this is especially important for a semi-auto, it’s less important for a revolver. Now, don’t get me wrong, I’m not saying you never need to clean or oil a revolver, but you don’t need to do it as often as with a semi-automatic.
When semi-autos first arrived on the scene, most people agreed that revolvers were more reliable and dismissed them. But over the years, handgun manufacturers have improved the durability and functionality of semi-automatic weapons.
Semi-Auto Advantages
Now here are the top three reasons to consider a semi-auto:
They have a higher capacity. Most revolvers have a five- or six-shot capacity. However, semi-autos have a much wider range of magazine capacity — usually anywhere from 7–19 rounds depending on the firearm. Obviously, if I was in a gunfight, I would rather have more rounds. In fact, when police departments around the country began switching to semi-autos, one of the biggest reasons was so officers had more rounds in the event of a shootout
They’re quicker to reload. There are people who will tell you that they can reload a revolver faster than you can reload a semi-auto. And someone who has practiced reloading a revolver can probably do it pretty quickly. However, the average person will likely always be faster at reloading a semi-automatic than a revolver
They have better accuracy. The majority of people will be more accurate shooting a semi-automatic than a revolver because of the more modern design. Most semi-autos have less recoil and muzzle jump than revolvers. Also, semi-autos tend to have a smoother trigger pull than revolvers, and when you combine these factors, they usually allow for better accuracy.
When it comes down to which type of handgun is better, it really depends on personal preference. If you suffer from arthritis and can’t pull the slide back on a semi-auto, then you might want to consider a revolver. However, if you carry concealed often, you probably want a semi-auto that can hold more rounds.
To figure out which side of the fence you’re on, I recommend going to your local gun range. Rent a few different guns of each type and see what works best for you.
Fortify Your Castle
![]()
A SEAL’s Guide to Home Defense
Most of us can’t afford a Level 1 security system with immediate armed response and all the high-tech bells and whistles you could ever need. But here are four steps anyone can take to deter a would-be intruder:
1. Install an external Wi-Fi security camera. There are several very reasonably priced external cameras available — many for under $200. A security camera has two functions. First, they allow you to monitor the exterior of your house with a live feed through your phone or TV. Second, if a criminal sees a camera at a point of entry — they will likely move on to a home without one.
2. Secure ALL points of entry. If you can fit your head through it — secure it! This includes all ducts, crawl spaces and especially basements. Plywood or several layers of high-tensile-strength mesh wire will do the trick.
3. Fortify your windows and doors. For doors, I’m a big fan of using two Grade 1 deadbolts. The second lock should be keyless, meaning it can only be locked from the inside, not accessed from the outside. To secure your windows, buy a few dowels (at least 1″ diameter) from the hardware store to put in the window tracks. Secure any sliding glass doors this way as well.
4. Make your own alarm system. Add a magnetic alarm unit to every door and window in your house. I’m a fan of the ones made by Swann — you can buy 10 for just under $30. These little devices sound with a screaming 110-decibel siren when the two pieces of the unit are separated. If that doesn’t scare away your intruder altogether, it should at least give you a few extra seconds to respond.
Remember, criminals will follow the path of least resistance. When confronted with even the slightest challenge, they’ll simply move on to the next house.
This Is Not a Drill
Unfortunately, no amount of preemptive safety measures will keep a tenacious trespasser from gaining entry into your home. Which means you should know how to respond once a breach has occurred — with zero hesitation.
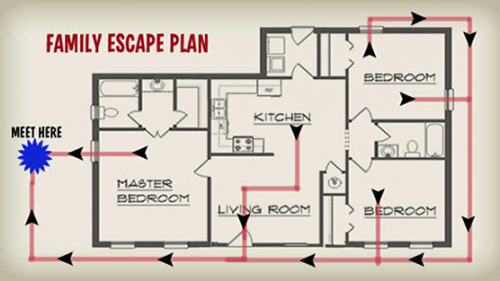
If you don’t have an alarm system to alert the household to the presence of an invader, establish a code word or words that everyone knows mean trouble to initiate a predetermined escape plan — i.e., leave the house and rendezvous at an agreed-upon meeting point or head to the safe room
Draw a sketch of the interior of your home and mark alternate points of exit that could be accessed while avoiding the area the intruders have breached. Be sure to have more than one exit strategy, including alternate escape routes for the front, rear and second floor
Rehearse, rehearse, rehearse. In special ops, we rehearse dozens of times before going on a mission. It’s one of the most important factors of success. The plan becomes second nature, and if something does go wrong, you are better able to adjust. If you have kids, don’t turn these practice drills into a scary situation, but be sure to rehearse with the lights off, so they get used to maneuvering in the dark
Speaking of kids, teach your children how and when to dial 911. And if they get separated from you, they should know which neighbor to go to and what to say.
Once a criminal is inside your home, the No. 1 goal for you and your family is to avoid the intruder. Remember these helpful tips so you (and every member of your family) can be a survivor, not a statistic.
Don’t Believe Everything You Hear
![]()
10 Ways to Protect Yourself From Social Engineering Hacks
In a security context, social engineering is the use of deception and manipulation to obtain personal or confidential information to use for fraudulent purposes.
It’s amazing how — with very little information — hackers easily exploit social engineering skills to extract information from banks, utilities, email providers, online retailers, social media companies, even government agencies.
Let’s say the hackers want to get into your online bank or Gmail account. They would simply go through the “I forgot my password” process. This ploy can be used to hack into accounts for major sites like Facebook, iCloud, Dropbox, PayPal, even online banking websites.
Beef up Your First-Aid Kit
By Omar Hamada
Putting together your own first-aid kit is easy — but it isn’t all Band-Aids and ibuprofen. I recommend adding the following items to your medical supplies. You never know when they may come in handy…
• A trauma pack — like the ones Adventure Medical offers
• SAM splint and an ACE wrap or two for fractured or sprained limbs
• Waterproof and sweat-resistant sunscreen like Sawyer sunscreen lotion
• Insect repellent — try Ben’s repellent spray, which contains 95% DEET and provides a lasting 10-hour tick protection and 13-hour mosquito protection
• High-quality liquid bandage that is 100% antiseptic to prevent any infections — in a pinch, superglue will do
• Something to reapproximate lacerations like the Oasis skin stapler
• Topical antibiotic ointment like Bacitracin or Neosporin
• And a survival saw like Survival Tough’s pocket chainsaw.
Every single one of those accounts is vulnerable to this kind of social engineering attack. And companies are doing little to prevent this from happening. Yet another reason why the burden of protecting your online security rests on you.
If you follow these 10 steps, you’ll achieve the highest level of protection possible when it comes to your online accounts:
1. Have a passcode on every account. This is pretty basic, and many companies already require a four-digit security pin that you set up when you first create your account. Obviously, make sure this number isn’t similar to any other number, such as your SSN or address, and use a different pin for every account you have.
“Every single one of [your] accounts is vulnerable to this kind of social engineering attack.”
2. Use a separate email address for your cellphone account. Create a new email address and use it only for contact with your cellphone carrier. This may be inconvenient, but you don’t want this email connected to any other websites. Right now, you probably have your phone number and primary email address tied to several different accounts. If one account is breached, the hackers can easily gain access to your other accounts.
3. Block online access to your cellphone account. This removes the ease of viewing your account online, but it’s another way of stopping hackers from stealing your information. You’ll have to go into a retail store to access your account or change information, but it’s worth it to keep your account secure.
4. Ask your cellphone provider to require photo ID to alter your account. This is just an added layer of security. The more the better when it comes to preventing fraud.
“Even if you think you have strong passwords, you should revisit them.”
5. Use Google Voice. A Google Voice number can’t be ported to another device, meaning a hacker couldn’t reroute your communications to their phone. Let’s say you want to use Google Voice, but don’t want to get new phone number. You can set up Google Voice with your existing cellphone number. Then go to your cellphone provider and ask for another number for a second line. Your old number is your Google Voice and you have a new number from your cellphone carrier. Don’t share the new number with anyone. Have all calls to your Google Voice (old number) forwarded to your new number (the number only you know). You can also set it up so that all calls or texts from your new number (the number only you know) will appear to come from the old number.
6. Option No. 2 with Google Voice. The only drawback to the step above is that you’ll be paying your cellphone provider for two lines. If you don’t want to pay for two phone lines, you can just set up a new number through Google Voice. Set up a new Gmail account, but don’t provide any backup email address or backup phone number. You don’t want anything tied to this new Gmail account. Set up Google Voice with your new email address. Select a phone number for this Gmail account — you can even have a random area code. Use your Google Voice number for all your important online accounts — banking, Facebook, Twitter, etc. This way, you won’t have to worry if your cellphone number is hacked, as none of your important accounts is tied to your real number. If you choose this option, make sure your new Gmail account has a very strong password, since it will be connected to your other online accounts.
7. Create strong passwords. Even if you think you have strong passwords, you should revisit them. Make sure each one contains random numbers, upper- and lowercase letters and special characters. Passwords should be at least 10 characters long and random enough that they only make sense to you. Be sure to invent a different password for each of your accounts.
8. Give different answers to security questions. I’m sure you’ve forgotten your password to a particular website at one time or another and gone through the reset process. You’re usually prompted with security questions such as, “What was the name of your first pet?” The problem is when hackers steal information from a website, that information usually includes the answers to your security questions. I recommend giving dissimilar responses on each website, so if your answers are stolen, a hacker can’t go to another website and use them to get into a different account.
9. Purchase a security key. The YubiKey, for example, is a security key you plug into your USB port. When you open a website, simply enter your login information, and then put the USB key into the port and press the button on the key. Each security key has a unique chip that completes the security process when you push the button. In other words, the physical presence of the key is required anytime you want to log in to your accounts. This prevents anyone who doesn’t have the key from logging in. If you decide to use this key, you need to verify the websites you want to use it with support this protocol. Currently, a lot of websites — Gmail and Dropbox, for instance — offer this security.
10. Use biometric authentication. This type of verification requires a fingerprint, eye scan or voice verification to access your account. This only works with mobile devices that recognize one of these biometric readings. However, most new cellphones offer some type of biometric security, and popular websites are adding it to their log-in options. Biometric authentication can still be hacked by very sophisticated criminals, but it’s incredibly costly and time-consuming, so it’s not likely to happen on a large scale.
The 10 steps I’ve outlined here will take time to implement, but if you follow them, you will be infinitely better protected from hackers looking to steal your information and access your online accounts. Remember, it’s up to you to keep your information secure, so take the necessary precautions today.
Protect Yourself From the Elements
![]()
How to Build a Survival Shelter Anywhere
It began as an ordinary fishing trip, but the day took an unexpected turn as night fell and Mike Vilhauer realized he was lost.
Knowing he was going to have to spend the night in the Sierra Nevada mountains, Mike decided to make a shelter using pine needles and willow tree branches to keep warm. The next day, Mike tried to hike his way back to safety, but no such luck. He was forced to stop and erect another shelter the second night.
Mike survived for five full days by drinking water from streams and building shelters to stay warm at night. Even though he didn’t get much sleep or food during the ordeal, search and rescue crews eventually found him and he made it home safe and sound.
The lesson here is that Mike absolutely did the right thing to stay alive. If he hadn’t had the wherewithal to build shelters for warmth, the story likely would have had a different outcome.
For this reason, I’m going to teach you how to build simple, effective shelters in three different types of environments — in case you ever find yourself stranded in the elements.
In the Woods

A lean-to is one of the simplest shelters to set up in a forest. The first thing you’ll need to do is find a large tree or boulder. Then take tree limbs (approximately 6–7 feet long) and put one end on the ground, leaning the other end against the large tree or boulder you’ve staked out.
Next, take smaller branches, leaves, pine needles, bark or anything else you can find and place them on top of the leaning limbs. You’ll need enough to cover all the limbs that are leaning to protect yourself from the elements.
You should also use leaves, bark or pine needles to cover the ground inside the lean-to. If you sleep directly on the ground, you will lose body heat.
In the Snow

If you are stranded in the snow, one of the quickest ways to build a shelter is by making a snow cave. When digging a snow cave, the most important factor is choosing a safe location.
Ideally, you need to find an area with large snowdrifts, such as a mountainside. Avoid building a shelter up against a tree because there are usually air pockets in the snow around trees, which means the snow won’t be deep enough.
Once you’ve picked out a good spot, start by digging an entrance into the cave and then dig up to create a dome shape. In other words, the entrance should be lower than the rest of the snow cave. This will help keep warmth inside since you will need to leave the entrance open for air movement.
In the Desert

Desert conditions are typically the most challenging environments in which to build a shelter. The key is to give yourself protection from the elements — most importantly, the sun.
One of the best shelter options in the desert is a pit shelter, which is essentially just a large hole that you can fit your whole body into. But don’t waste your energy digging one that’s too large, because you want to keep your body close to the walls of the pit for insulation.
For the finishing touch, place a tarp, poncho, clothing or anything else you have over the top of your pit. The more layers you can add, the better off you will be.
The Bottom Line
I’m sure you’ve heard of the “rules of three” when it comes to survival. Basically, you can survive three minutes without air, three hours without shelter, three days without water and three weeks without food.
In a survival situation, provided that you are still breathing, shelter should be your next priority because hypothermia and heat stroke can kill you pretty quickly. Once you’ve got a shelter to protect yourself from the elements, you can tackle finding food and water and — like Mike — you’ll eventually make it home alive.
Don’s Be Vulnerable on Vacation
By Jason Hanson
Next time you plan a hotel stay, remember these five safety measures to help you avoid being an easy target:
1. Research the hotel. When you stay in a hotel, you should familiarize yourself with the layout and surrounding area in case of an emergency. Always carry important contact numbers for family and local law enforcement — and the U.S. Embassy if you are traveling abroad. Never stay at a cheap motel, especially overseas. In the U.S., a cheap hotel may get you bedbugs, but overseas, it may get you kidnapped or killed.
2. Always get an extra key. When checking into a hotel, always request two keys — even if you’re by yourself. Criminals will often hang out in hotel lobbies looking for easy victims to attack or rob. If they overhear you say you only need one key, they’ll know you’re alone. This is especially critical for women who travel solo.
3. Stay between the third and sixth floors. Always book a room on or above the third floor and on or below the sixth floor. Most crooks target lower floors because they’re easier to rob and make a quick escape. If you stay higher than the sixth floor, you might end up stranded if there’s a fire. In the U.S., most firetruck ladders don’t reach past the sixth floor.
4. Keep your plans to yourself. When checking in, don’t talk about how you will be gone all day sightseeing or how you are going to spend a fortune on a once-in-a-lifetime experience. The last thing you want to do is broadcast if your room will be empty or if you have a lot of money.
5. Never trust a hotel safe. Don’t leave jewelry, passports, money or any other valuables in the safe in your room. These safes usually have combination locks, and you never know who has access to the combination. In fact, most hotel safe thefts are inside jobs, so keep your valuables with you or find a better place in the room to hide them. One trick you could use: Bring Gorilla Tape with you and tape your valuables to the underside of the couch or nightstand.
Staying in a nice hotel should be a relaxing experience for you and your family. By implementing these safety tips, you will be better protected wherever you may roam.
Fit for Human Consumption?
![]()
The Viability of Veterinary Medications
One very effective way to procure and stockpile prescription medicines for the rainy day is to use veterinary medications meant for horses, cattle, dogs, cats and fish. These meds are relatively cheap, readily available and easy to find at your local co-op, big-box store or veterinarian.
What I’d like to do in this article is give you a down-and-dirty guide to help you prepare for the possibility of being unable to get your prescription and over-the-counter (OTC) medications during a crisis.
Take Two and Call Me in the Morning
To start, allow me to briefly discuss the differences between medications that are packaged for human use versus those that are labeled, “For veterinary use only. Not for human consumption.”
The main differences you need to pay attention to between drugs labeled for human use versus veterinary drugs are the dosages and quality control standards to which the drugs are produced. Veterinary processes are quite a bit looser than those used in production of drugs for human use. That’s one reason for the price differential.
However, in general, there shouldn’t be that much of a difference in topical medications (those placed on the skin), drugs that are orally administered or those that are administered in the form of a suppository. Where I’d be careful is with injectable drugs or those you put in your eye.
Stock Your Home Pharmacy
Make sure to store whatever medications you want to stockpile in a cool, dry, dark place in order to maximize the life of the medication. I recommend replacing your stock within two years of the expiration date.
OTC meds are easy to get. Go to your local pharmacy or grocery and buy supplies of
• 200 mg ibuprofen (Motrin, Advil, Nuprin)
• 500 mg acetaminophen (Tylenol)
• 25 mg diphenhydramine (Benadryl)
• 325 mg acetylsalicylic acid (aspirin, Bayer)
• 2 mg loperamide (Imodium)
• Bisacodyl (Dulcolax)
• Melatonin
• Steroid creams
• Yeast medications
• Whatever else you think you may need.
To procure an extra store of your regular prescription meds, ask your physician for a prescription for your second home, a stockpile or a long trip you wish to take. Most doctors are fine providing this with the understanding that your insurance company probably won’t pay for it.
“Veterinary processes are quite a bit looser than those used in production of drugs for human use.”
If your doctor isn’t comfortable writing an extra prescription, in the event of a crisis, consider cutting your dose in half temporarily. This will double the time you’ll have at least some medication available.
Animal Alternatives
Some prescription meds that are always good to have on hand in the event of an emergency include: Tamiflu, antibiotics, antifungals, non-narcotic pain medications. Sometimes, as above, you can get your physician to write you prescriptions for these without too much trouble.
If not, you can look for appropriate veterinary equivalents. One example that seems to be all the rage is fish antibiotics such as Fish Mox. Just remember, if you are allergic to the human form of amoxicillin (which is a semi-synthetic form of penicillin), you will be allergic to the fish form of amoxicillin — it’s the same drug!
Note that when it comes to veterinary equivalents of human medication, not everything is available. For example, you are going to have a hard time finding statins for animals, but you should be able to get blood pressure medications, insulin, seizure meds and select others without too much of a problem.
I also suggest considering alternative, holistic, naturopathic remedies — such as essential oils, herbs and the like — for certain conditions. Even better, do your best to get healthy and you may be able to wean off some of your medications entirely by losing weight, exercising, improving your diet, etc.


