
Dear Black Bag Confidential Reader,
Ah, the great outdoors…
Right now, thousands of Americans are taking advantage of the warm weather and some of our epic national parks, mountains and trails. Make it a priority to see these incredible sights — you won’t be disappointed.
Camping, hiking, fishing and rafting are all healthy and very gratifying activities. But you must understand that at any moment you could find yourself in a situation that is potentially life-threatening.
Today, I want to discuss what you should do if you find yourself in a position where you must cross a body of water — be it a pond, lake, stream or rushing river.
Dealing with water is inherently dangerous — even for the most experienced swimmer — so try to avoid doing this if you can. However, if you have to cross water, here are a few things you can do to ensure you make it to the other side.
We All Float On
Before you cross, you want to remove as much gear as you can so it won’t weigh you down. Buoyancy is the key to a successful crossing. Think packs, knives, boots, etc.
A prepared outdoorsperson will always include a large heavy-duty plastic trash bag in their pack. Not only is this a great idea for an improvised rain jacket, but you can also fill it with air and tie a knot in it for a makeshift inflation device.
Many people carry a water bladder on hikes as well. Obviously, this will keep you hydrated, plus you can use it to help you float. Simply empty the bladder and fill it with air. Now you have an inflation device to help you stay above water. Just make sure you are able to refill it with safe drinking water to remain hydrated.
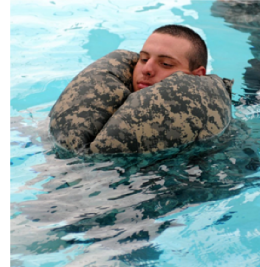 Early in my basic training in the Navy, we learned how pants can make a great floatation device. Simply remove them and tie a knot in the bottom of each leg. Zip and button them up and soak them.
From there, put the waistline just under the surface of the water and blow air up into the legs. Keeping the waistline below the waterline, place your neck between the pant legs and start kicking.
River/Stream Crossings
This is a very high-risk operation that should only be performed when absolutely necessary!
Again, remove as much additional equipment as you can and place it in your pack. In an ideal situation, you should have someone else with you along with a rope or line (preferably made of 550 paracord).
Then follow these steps:
- Step #1 — Tie a loop in one end that you can hold onto. Just make sure it is large enough that you can let it go if you have to. The last thing you want to do is get wrapped up in the line. Then have your partner hold the other end so they can pull you back to shore — or wrap it around a tree or rock to anchor it
- Step #2 — Start your entry upstream so you’ll end up on the other side where your line is anchored. Slowly enter the water and start backstroking to the other side. Your body position should be on your back with your legs in front of you to absorb any impacts from rocks, branches, etc. — especially if the water is flowing fast
- Step #3 — Once you make it to the other side, your partner should tie off any packs you have so you can pull them across. Again, if your packs have a hydration bladder or a plastic bag, inflate them and place them inside the packs for better buoyancy and then pull them across
- Step #4 — Next throw the line back across to your partner. I suggest tying a rock to the line to make this easier. Your partner should then attempt the crossing in the same manner as you did.
Let me repeat — this is a VERY HIGH-RISK operation and should ONLY be performed if you absolutely must get to the opposite bank.
Be a survivor… not a statistic,

Cade Courtley


