
Don’t Get Caught With Your Pants Down When the SHTF
The SEAL teams are known around the world for being (to use a boxing term) “pound for pound” the fiercest fighters on the planet. It is not uncommon to roll out on a mission with over 100 pounds of gear. Body armor, weapons, ammo, rockets, comms, gear, gear, gear…
“Be able to ‘pack a punch’ yet be versatile and streamlined in [your] movements.”
I’m proud to say that being a Navy SEAL is a force multiplier. An 18-man platoon can go against a 100-man force — and when the dust settles there will be 18 SEALs left. Yes, I’m biased, but history has my back.
Going in HEAVY was our SOP (standard operating procedure). So when I transitioned from the SEAL teams to employment with “The Agency,” I realized several things very quickly:
1. We weren’t rolling with 18 “pipe hitters” and dedicated air support.
2. Our best tactic was to blend in (vehicle, clothes, attitude, etc.).
3. If the SHTF, we were on our own. That’s why we got the BIG bucks!
Essentially, when you change missions, you have to change tactics. And one of the first things you have to address is gear: What configuration will maximize mission performance?
I still had to be able to “pack a punch” yet be versatile and streamlined in my movements — and, most importantly, be able to expeditiously exit my vehicle.
Thus the creation of the BAT BELT — short for “battle belt.” This piece of equipment is meant to ride evenly on your hips (below your body armor) without being obstructive. It holds your offensive gear on the right and reloading/defensive gear on the left.
This not only evens out the weight but also aligns with your training to help you select the right gear from muscle memory. This is the same reason police officers have their primary handgun on the opposite side of their stun gun. It prevents them from drawing their handgun when they want to utilize a nonlethal option.
It’s Battle Time
Now I’m going to show you how to build your own BAT BELT just like mine.
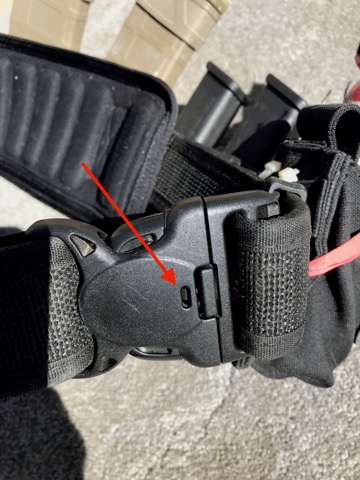
I recommend using a two-inch adjustable combat/Velcro belt and a four-inch clip-on buckle. This is the foundation of your BAT BELT.
“Remember, in an emergency, the one enemy more dangerous than anything else is darkness.”
Don’t get a MOLLE system or a pre-conditioned belt — this will only limit your ability to customize it. Make sure you get a combat belt with a secondary locking buckle system (see below).
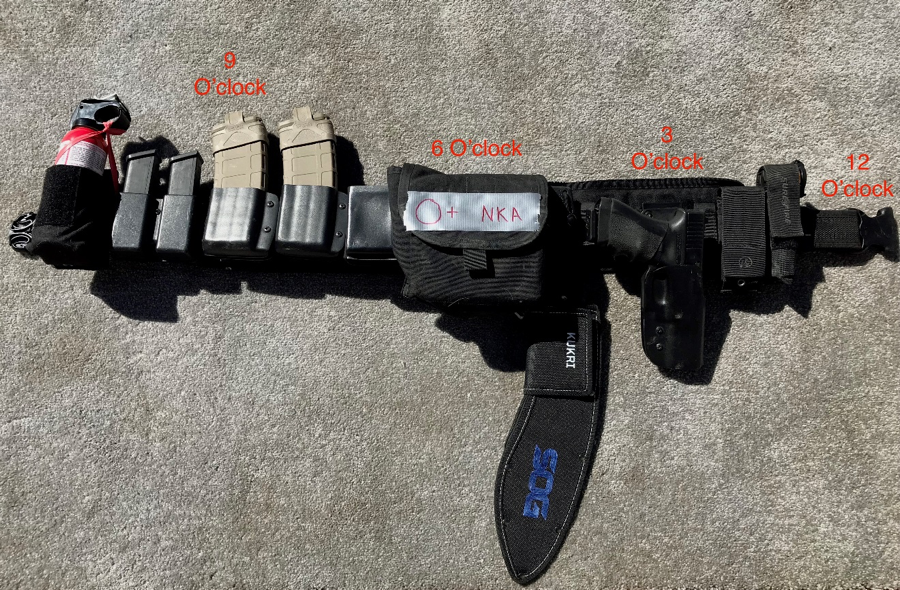
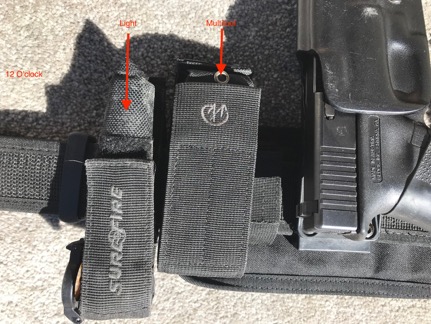
12 O’CLOCK — THE BASICS
Let’s start at the middle of your waist (belly button), which I will refer to as 12 o’clock. Then we’ll proceeded clockwise (to the right) from there.
You’ll want your flashlight and your multitool front and center. Remember, in an emergency, the one enemy more dangerous than anything else is darkness.
3 O’CLOCK — WEAPONS
Working your way around, next is your handgun. Every BAT BELT will be slightly different based on your weapon systems. I am set up for an AR-15 as my primary with a .40-caliber Glock 22C as my secondary.
I strongly suggest going with a Kydex or carbon fiber three-inch drop-down holster so your handgun is clear of ALL other accessories on the BAT BELT.
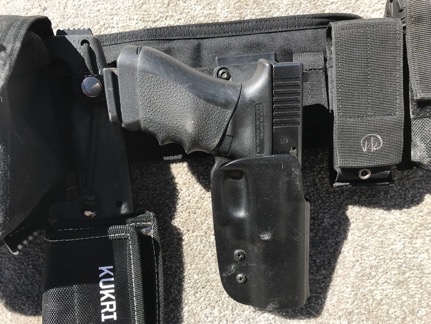
Also at your right hip should be a kukri knife like the SEAL Saber. With multiple uses, this is so much more than a knife. It’s just over 18 inches long, but rides tightly against your thigh, remaining out of the way while still being accessible. Plus, it’s incredibly lethal.
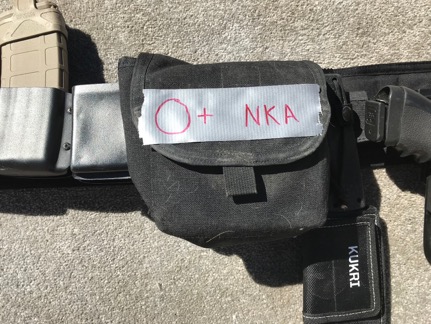
6 O’CLOCK — MEDICAL
To create my own med kit, I use a standard 7.62 mm 100-round ammo bag placed at the 6 o’clock position so I can reach it with either hand. There are a number of items you can put in your med pouch. I suggest concentrating on items that can stop bleeding.
At minimum, you should have:
• Surgical gloves
• Sterile gauze
• Tourniquet
• Any prescribed medications you are currently taking.
Pro tip: Write your blood type as well as any allergies on a piece of duct tape and stick it on the external flap of your makeshift med kit — just like I did. (NKA stands for no known allergies.)
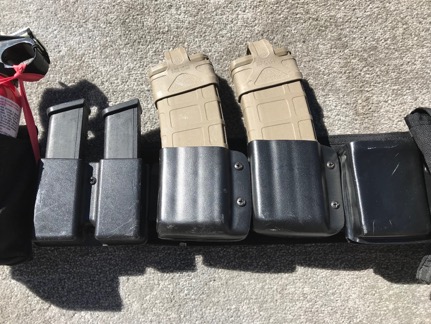
9 O’CLOCK — EXTRA AMMO
I used to carry A LOT more above the waist, but for the purposes of this article we are sticking with the BAT BELT.
Just like with your holster, I highly recommend Kydex or carbon fiber ammo pouches. For my weapon systems, I have:
• Two 30-round (5.56) AR-15 magazines
• Two 15-round (.40-caliber) Glock magazines.
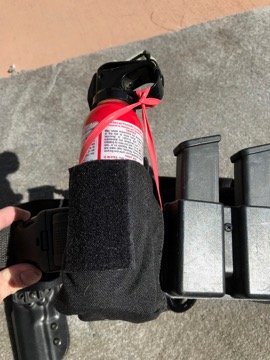
On my left hip, I also keep a can of bear spray. This is useful if you find yourself in a situation where you are outnumbered or the use of deadly force is not an option. It’s incredibly effective and easy to use.
You will notice I have anchored my canister with a larger rubber band. This helps keep it in place while I’m running, but still allows me to deploy it quickly.
That brings us back around to the 12 o’clock position. There you have it: THE BAT BELT.
I introduced the BAT BELT to Doug Hill, Spy & Survival Briefing publisher and TOP SHOT, when he visited my off-the-grid property last summer. He thought it was so awesome he was motivated to make his own! 
Join the club — and be a survivor, not a statistic.
Why Prepping Is Just About the Sanest Thing You Can Do
![]()
When I hear people say that buying survival gear and stocking up on emergency supplies is a waste of time and money, I can’t help but think they live under a rock. Obviously, they aren’t watching the news.
The fact is the U.S. economy is still shaky, nuclear proliferation is a huge problem and a major disease could hit the U.S. and spread like wildfire. And don’t forget about natural disasters.
In 2017 alone, we saw wildfires and mudslides destroy the landscape in California… hurricanes in Florida, Texas and Puerto Rico that caused massive flooding… powerful wind storms in Michigan that led to the largest power outage in the state’s history…
That’s only the tip of the iceberg.
Being prepared for disaster can also save your family if you lose your job, suffer a medical emergency or even experience a house fire. I can tell you there have been times in my life when my family has struggled financially and we relied on our food storage to get by.
My point is prepping is like insurance. You hope you never need to put your emergency plans into action, but when the SHTF, you’ll be glad you made them.
That’s where my team and I come in. We bring you tons of actionable advice every month so you won’t be one of the people looking to the government with empty hands when the next disaster hits.
For example, in this issue Cade Courtley demonstrates how to put together a tactical arsenal you wear around your waist, Omar Hamada gives you a complete rundown of burn treatment and I break down different types of shotgun ammo so you can save money by stocking up on the right kind.
So get started reading, and as always…
Stay safe,
Jason Hanson
Edible Gold in the Cashless Economy
![]()

Five Ways to Put Your Money Where Your Mouth Is
When folks picture a nuclear attack, they see mushroom clouds… charred skeletons… and buildings turned to dust.
But a silent nuclear attack — one that leaves buildings untouched and people unharmed — is just as likely… and even more deadly.
If North Korea or Russia detonates a nuclear warhead high above the U.S. mainland, the resulting EMP (electromagnetic pulse) would send America back to the Dark Ages.
Without computers or banks, our economy as we know it falls apart. And without factories or farm machinery, food production takes
a nosedive.
The resulting gap in production versus demand would cause mass starvation, the likes of which has never been seen in this country.
But if you are one of the industrious few who take it upon themselves to grow their own food, you can feed your family fresh produce. And you’ll be in control of an in-demand resource for trade and barter.
Growing your own food can be a challenge if you’ve never farmed before. So here’s a rundown of the easiest crops to grow to get you started:
Radishes: Not everyone enjoys the spiciness of these root vegetables. But they’re easy to grow, thrive in even poor soil and take just 20–24 days to reach full size. They’re also a great source of vitamin C — ideal for keeping away scurvy when you can no longer get your hands on citrus.
Turnips and Carrots: These root vegetables grow well in similar conditions and even alongside each other. Plant these for hearty stews and nutritious salads. They can be planted in the spring for a summer harvest or in late summer for a fall crop. Turnips can be harvested 45–50 days after planting, while carrots reach maturity in 50–80 days.
“Without factories or farm machinery, food production takes a nosedive.”
Lettuce: Some folks will tell you that lettuce has no nutritional value, but that’s not true. A couple of leaves aren’t going to fill you up, but there’s a nice mix of vitamins, fiber and water content packed inside. Plus, it’s easy to grow. Lettuce prefers cool temperatures, so you’ll want to plant it in the spring and the fall.
Orchard Trees: If fruit trees will grow happily in your climate, they’ll be a wise investment. Apples, pears, peaches and plums will be in high demand after the food production and distribution chains break down.
Corn: Grains are tough to grow in a small space. They are high maintenance and low yield. But corn is more versatile and happy to share its space with other vegetables. You can increase your yield by planting your corn alongside some squash and pole beans. This is a technique developed by the Native Americans. All three crops grow together symbiotically and protect each other from their natural predators.
Right now is the perfect time to get your garden ready for the growing season. Even if you don’t have a yard, you can plant some of these items in large containers.
Any amount of preparation is better than none — especially when it comes to providing food for your family.
Shotgun Ammunition in a Nutshell
![]()
How to Choose the Right Rounds for the Job
One Christmas morning around 3:30 a.m., Nathanael Blair of Santa Ana, California, heard a noise coming from his garage and went to investigate.
Upon entering his garage, Blair was hit in the face with a metal wrench. He retreated inside his home and grabbed his shotgun that was loaded with birdshot rounds. Blair fired his shotgun at the suspect, later identified as Jeremy William Bell, hitting him in the back. Bell fled the scene. When the police arrived, they found him hiding in a nearby garage.
Bell pleaded guilty to felony burglary, aggravated assault and robbery charges. The Orange County District Attorney’s Office did not file any charges against Blair after determining he was acting in self-defense when he shot Bell.
Gun Insurance: A Wise Investment
Around 15 million Americans are licensed to carry a concealed weapon in the United States. That figure will likely continue to rise based on the criminal climate.
With that in mind, here are a few gun insurance options I recommend. This specialized coverage will help protect you if you have to use your firearm to defend yourself.
• The United States Concealed Carry Association (USCCA):Starting at just $13 a month, you can purchase plans that offer up to $300,000 in legal defense funding
• NRA Carry Guard. Plans start at $13.95 per month and provide up to $250,000 in legal coverage
•
U.S. Law Shield. For $10.95 a month, you’ll get legal coverage “from start to finish.”
As with any insurance plan, make sure to read the fine print. But gun insurance may be something worth investing in if you ever have to shoot someone in self-defense.
Lock and Load
The fact is a shotgun is a great home-defense weapon. However, it isn’t a one-size-fits-all firearm. There is a variety of shotgun ammunition — each type works best in different situations. Have you ever considered which types of ammo you should buy and when to use them?
“A shotgun is one of the most popular firearms for home defense.”
To help you decide what you need, here are four kinds of shotgun ammo plus when to use them for maximum effectiveness:
Birdshot — This is the smallest type of shotgun pellets available. As the name implies, birdshot is typically used by hunters to shoot birds or other small game. Birdshot is ideal for this scenario because the large number of small pellets increases the chances of hitting the target. However, it’s not great for shooting large animals or self-defense since it may not penetrate larger targets. Personally, I would never use birdshot for home defense.
Buckshot — The biggest difference between birdshot and buckshot rounds is that buckshot uses larger pellets. Buckshot can be used to hunt larger animals because the bigger pellets cause more damage compared with birdshot. Buckshot is a common round used by law enforcement as well as people who use a shotgun for home defense. I’m sure you’ve heard the phrase, “double-aught buck,” which is a .33-caliber buckshot round that usually contains about eight pellets. This is the home defense ammo I prefer to use in my Remington 870.
Slugs — One of the most powerful and damaging types of rounds for a shotgun is a slug. A slug is a single projectile, as opposed to birdshot or buckshot, which shoot multiple smaller projectiles. One of the advantages to a slug is that it can extend the accurate range of your shotgun up to about 75–100 yards. Birdshot and buckshot are accurate at much shorter ranges — about 25 yards. Unless you live in a mansion, you don’t need to use slugs for home defense. With slugs, there is a risk of over-penetration. The round could go right through the wall into another room — or even into your neighbor’s house.
Dragon’s breath — When you were a kid, I’m sure you were taught never to play with fire. Well, Dragon’s breath gives you the chance to do just that. Dragon’s breath is a shotgun shell that fires a pyrotechnic payload up to about 40 yards. This type of round doesn’t really have any hunting purpose. It is also dangerous to use for self-defense, unless you are outside in a completely open area with nothing nearby that could catch fire. Similar to Dragon’s breath, there are also rounds called flash bangs, which emit a bright flash and an incredibly loud sound. These rounds are designed for recreational shooting — I would be cautious using them for anything else.
A shotgun is one of the most popular firearms for home defense. It’s important to know the differences between ammo types so you can be sure you have the right rounds for the job. As I mentioned, I use 00 (double-aught) buck for home defense, but I still have plenty of birdshot and slugs for other situations.
Make Your Home Blackout-Proof
![]()

Build an Off-the-Grid Solar Electrical System
On March 1, 2018, San Juan, Puerto Rico, experienced a widespread blackout. Nearly 1 million people were affected. Power at the airport and several hospitals was lost. The worst part is there was no backup system in place because it was still damaged from Hurricane Maria in September.
This isn’t just a coastal issue. Those who live in the middle of the country aren’t immune to power outages. Not only do we have to contend with an aging electrical grid but utility systems are a viable target for cybercriminals as well.
Whether you want to prepare for a major blackout — or you just want to live off the grid without giving up the comforts of electricity — here are some things to keep in mind when setting up your own solar-powered electrical system.
Determine your needs. First, calculate how much power you’ll need to keep things going. Make a list of the items you plan to plug in. Then separate the items that are a must from what you can go without. I recommend creating a spreadsheet of all the electronics you’ll be using off the grid. Use an electricity kilowatt usage meter to determine how many watts each item uses. These meters sell for around $20 on Amazon.
Set up a battery bank. When using solar energy to power your system, it’s important to set up a battery bank. This way you can run your home off the battery-stored power when the sun isn’t out. The number of batteries you’ll need will depend on how much of a buffer you want. The best batteries to use are deep cycle lead-acid batteries. They store a lot of power and never fail to produce the juice when needed.
“I have no doubt we will see more and more power failures in the near future.”
Get a power inverter. Small appliances, lights and most other electronics in your home typically run on alternating current (AC). However, solar panels convert sunlight directly into direct current (DC). You’ll also need a power inverter to convert from DC to AC so you don’t fry your devices.
Invest in a charge controller. A charge controller regulates voltage and keeps the batteries from overcharging as power is moved into the battery bank for storage. If you are using both DC and AC power, you will need a load controller for each type of current. In theory, you could run strictly off DC, although most homes are wired for AC current. It’s critical to have the correct load controller so you can manage the voltage for the items you are trying to power.
Hook up a generator and transfer switch. A generator isn’t mandatory, but it’s a good idea to have a backup in case of an extended period of weak sunlight. I own a propane generator because the fuel is safe to store, doesn’t smell and won’t go bad like gasoline. If you buy a backup generator, you will need a transfer switch so you can shift drawing power from your battery bank to your generator.
When it comes to solar energy, there are a lot of options out there. You need to figure out what configuration fits your needs and how much you want to spend. A few companies I recommend checking out are Renogy, Grape Solar and Goal Zero.
I understand that building your own solar-powered electrical system sounds a bit overwhelming. But I have no doubt we will see more and more power failures in the near future. Now is the time to prepare to be self-reliant.
Six Survival Lessons I Took to Honduras
![]()
Putting Preparedness Into Practice Hundreds of Miles From Home
A few weeks ago, I spent eight days in Roatán, Honduras, on a scuba diving trip. The weather was perfection, the diving was relaxed and I saw some AMAZING stuff. I even spent some time hanging out with a couple of Caribbean reef sharks — much to my mother’s chagrin.
The thing about sharks is they’re not really interested in human blood — it smells completely different than fish blood. Which is why we were nice and brought along a bucket of fish heads. Like how when someone invites you to their home, you bring a bottle of wine.

Needless to say, I returned home with all my limbs — honestly, my trip could not have gone more smoothly. In part, thanks to these six survival lessons I took with me:
1. Be Prepared — The night before I hopped on the plane, I said to my partner, “Ask me what I forgot.” They proceeded to list items I might have overlooked — toothbrush, vitamins, sunscreen, socks… Wait. Socks? I almost forgot socks! A thick, cushy pair of moisture-wicking socks (wool works great) is critical if you plan on trekking long distances, especially in humid climates. After I threw a few pairs in my suitcase, I was good to go.
2. Know Your Gear — Once a year, I have my scuba gear serviced at a local shop. When I picked it up prior to my trip, I hooked up my first stage to a tank and checked it myself to make sure everything was in working order. Every day on the boat, the divemaster would go around and switch our tanks between dives until I told him I preferred to do this myself. That way I would know everything was hooked up properly, my air was on and there was at least 3,000 psi in my tank.
3. Have a Plan — Before each dive, the divemaster would run through a quick dive profile, including the type of dive, dive time, max depth and what life we should look out for. This is an important step because once you’re underwater, your communication is limited. It’s also a good idea to confer with your buddy and go over hand signals, limitations, etc. Even after all that preparation, plans change. If something happens in the water — if you or your buddy has to make an emergency ascent for ANY reason — stay calm, breathe and remember your training.
4. Head on a Swivel — Maintaining good situational awareness is ALWAYS important — even more so when some of your senses are dulled or restricted. I’m constantly looking around underwater, for a couple of reasons: 1) to keep tabs on my buddy, 2) to look out for cool creatures and 3) so I don’t bump into the reef or another diver. It’s easy to get engrossed in hunting for the small stuff — seahorses, flamingo tongues, nudibranchs, etc. — but remember to look up every once in a while.
“Above all, the most important thing to remember is breathe.”
5. Stay Hydrated — Hydration is essential to good health. When diving, the sun, salt water, dry tank air and physical exertion all do their part to suck your body dry. In addition to headaches, dizziness and that general parched feeling, dehydration also exacerbates the symptoms of decompression sickness, aka “the bends.” I’m terrible at remembering to hydrate, but for my safety, I had to remind myself to drink lots of water between dives (and go easy on the rum each night).
6. Just Breathe — The first time I donned a wetsuit, the instructor explained scuba diving like this, “It’s easy. Just breathe in and breathe out.” And Scuba Steve (yes, that really was his name) is right. Most of the skills you learn when you certify are in-case-of-emergency skills. Above all, the most important thing to remember is breathe. Don’t panic, don’t hold your breath and don’t hyperventilate. After a few days in the water I realized I was using Cade’s combat breathing technique. Inhale for four, exhale for four. Repeat.
The ultimate lesson here is that the survival concepts we discuss in these issues are widely applicable. There I was 1,700 miles from home and 100 feet underwater thinking about the things I’ve learned from Jason Hanson, Cade Courtley and Omar Hamada — and putting them intro practice.
Surviving the Third Degree
![]()
Save Your Skin With the Four-Step Burn Response
I don’t know about you, but I love fire. Yet with fire comes danger…
Though statistics differ, the CDC reports that 1.1 million Americans seek medical care for burn injuries every year. Of these victims:
• 50,000 require hospitalization
• 20,000 are considered severe, with burns covering more than 25% of the body’s surface area
• 4,500 Americans die from their burns, and
• 10,000 die from the related infections.
Let’s quickly break down burn severity. First-degree burns hurt but only involve the top layer of skin. These heal in three–five days. First-degree burns are usually caused by sun, splashes or flash flames.
Second-degree burns are partial- to full-thickness burns that blister and weep. Partial-thickness burns usually heal in 10–21 days, but full-thickness burns usually require surgical intervention — including debridement and skin grafting.
Third-degree burns involve the full thickness of the skin and extend to layers beneath the skin. They are usually dry and cause severe tissue damage with long-term disfigurement.
Burns can occur due to electrical, chemical (we covered these in the last issue), radiologic or thermal injury. Thermal injuries occur because of contact with open flames, hot surfaces, flash/explosive materials or scalds from hot liquids.
Too Hot to Handle
What should you do if you are burned?
First, stop the burning and cool it down. Remove any clothing covering the burn and run cool water over the affected area for 10 minutes
“Make sure you stay well hydrated, as burns use up a lot of fluid as they heal.”
Second, protect the burned area. Apply an ointment or emollient to protect the underlying skin. Things like mayonnaise (believe it or not), aloe vera gel, triple-antibiotic ointment or even silver Silvadene will help protect and heal
Third, prevent further irritation. Wrap the burn with loose gauze to further protect it and reduce pain. Reapply your ointment/emollient of choice and rewrap it a couple of times a day
Fourth, manage pain and stay hydrated. The best pain control is one that reduces inflammation. Things like aspirin and ibuprofen or other NSAIDs work best. If you experience more severe pain, see your doctor for a narcotic. Make sure you stay well hydrated, as burns use up a lot of fluid as they heal.
See a doctor if your burn goes all the way around an extremity (circumferential), if your burn covers more than 10% of your body, if it’s is a second-degree or more severe burn (if you are blistering or the burn is weeping) or if you cannot control the pain with anti-inflammatories.
Lastly, what do you do if you have clothing that is melted on to your skin?
Go to the ER.
If you are in survival mode, cut away as much of the material as you safely can and then leave the rest intact and follow the four steps above.


